1 Въведение в урока за MS Access 2010, 2013, 2016 и 2019
Добре дошли в урока за MS Access. Този урок е предназначен да накара потребителя да започне и да работи с MS Access (оттук нататък просто „Достъп“) по бърз начин. Демонстрирани са четирите основни модула на Access:таблици, формуляри, отчети и заявки. Първо се обсъжда бизнес пример, който предоставя основа за разработване на проста база данни.
Предполага се, че потребителите на този урок са опитни в работата с Microsoft Windows XP/Vista/Win7/Win10 и т.н. и с MS Excel. Това включва използването на клавиатура и мишка. Урокът е базиран на Microsoft Access, който е част от професионалния пакет на Microsoft Office, включващ също MS Excel, MS Word и MS Powerpoint.
Този урок обхваща MS Access 2007, 2010, 2013, 2016 и 2019, които имат общ интерфейс („лентата“ в горната част), който е различен от по-ранните версии. Ако се интересувате от работа с MS Access ’97 или 2000, моля, посетете ръководството за Microsoft Access – Обхващане на уеб страницата на MS Access ’97 и 2000.
Урокът започва с кратък преглед на Релационни бази данни . По-голямата част от системите за управление на бази данни, използвани днес, се основават на това, което се нарича модел на релационна база данни. Access е система за управление на релационна база данни. След това описваме бизнес пример и даваме схема на базата данни и приложенията, които искаме да разработим. В следващите раздели даваме инструкции стъпка по стъпка за създаване на таблици, формуляри за въвеждане на данни, отчети и заявки за приложението.
1.1 Предвидена аудитория
Този урок е предназначен за студенти, които тепърва започват работа със системата за управление на база данни MS Access.
1.2 Необходими знания
Този урок предполага, че студентът е запознат с основната работа на персонален компютър и Windows 2000, Windows XP, Windows Vista или Windows 7. Специфичните умения, необходими за този урок, са:
- Използване на мишката и клавиатурата
- Отваряне и запазване на файлове на твърдия диск и на USB памет (thumb drive) например
- Управление на файлове като цяло, включително разликата между буквите на устройството, твърдия диск и т.н.
- Изпълнение на програми от менюто "Старт" на Windows
- Минимизиране, максимизиране и преоразмеряване на прозорци
Ученикът трябва да разполага с USB памет (thumb drive) или друго преносимо устройство с памет, за да съхранява своите файлове, които ще бъдат създадени по време на този урок.
1.3 Изпълнение на Microsoft Access на Apple Mac
Един проблем, с който може да се сблъскат някои студенти, е фактът, че MS Access работи само под операционна система Windows (като Windows XP, Vista или Windows 7). Ако имате MacBook, iMac или друга система на Apple с MacOS, която използва процесор Intel, има няколко възможни алтернативи, които можете да опитате. Много съвременни компютри на Apple, които използват процесор Intel, могат да работят с операционна система Windows. Имайте предвид, че ще ви е необходимо легално лицензирано копие на операционната система Windows, за да направите това. Има два основни начина да постигнете това:
- Можете да настроите своя Mac на „Двойно зареждане“ както на MacOS X, така и на Windows. Един продукт, който може да позволи това, е софтуерът Apple BootCamp.
- Можете да стартирате Windows OS „едно до друго“ с Mac OS X с помощта на „виртуален“ компютър като VirtualBox
Съдържание
- 1 Въведение в урока за MS Access
- 1.1 Предвидена аудитория
- 1.2 Необходими знания
- 1.3 Изпълнение на Microsoft Access на Apple Mac
- 2 Кратък преглед на релационни бази данни и приложения за бази данни
- 3 Бизнес пример
- 4 Стартиране на Microsoft Access
- 4.1 Преглед на стартиране на Microsoft Access
- 5 Създаване и преглед на таблици
- 5.1 Създаване на таблица с помощта на изгледа за проектиране
- 5.2 Упражнение:Създаване на таблица
- 5.3 Преглед и добавяне на данни към таблица
- 5.4 Упражнение:Добавяне на данни към таблица
- 5.5 Създаване на връзки между таблици
- 5.6 Преглед на създаване и преглед на таблици
- 6 Създаване и изпълнение на заявки
- 6.1 Заявки с една таблица
- 6.2 Упражнение:Заявки от една таблица
- 6.3 Множество заявки за таблици
- 6.4 Упражнение:Множество заявки за таблица
- 6.5 Преглед на създаване и изпълнение на заявки
- 7 Създаване и изпълнение на формуляри за въвеждане на данни
- 7.1 Създаване на формуляр за една таблица с помощта на съветника
- 7.2 Упражнение:Създаване на формуляр за една таблица
- 7.3 Преглед на създаване и изпълнение на формуляр за въвеждане на данни
- 8 Създаване и изпълнение на отчети
- 8.1 Създаване на отчет за една таблица с помощта на съветника
- 8.2 Упражнение:Създаване на отчет за една таблица
- 8.3 Преглед на създаване и изпълнение на отчет
- 9 Създаване и стартиране на главен/подробен формуляр (формуляр с подформуляр)
- 10 Създаване и стартиране на табло
- 11 Създаване и стартиране на формуляр за навигация
- 11.1 Упражнение:Промяна на формуляр за навигация
- 11.2 Задаване на формуляра за навигация по подразбиране
- 12 резюме на урока и разширени теми
Следващата страница дава кратко въведение в релационни бази данни.
2 Кратък преглед на релационни бази данни и приложения за бази данни
Първите бази данни, внедрени през 60-те и 70-те години на миналия век, се основават или на плоски файлове с данни, или на йерархични или мрежови модели на данни. Тези методи за съхранение на данни бяха относително негъвкави поради твърдата си структура и силното разчитане на приложните програми за извършване дори на най-рутинната обработка.
В края на 70-те години на миналия век, моделът на релационна база данни който произхожда от академичната изследователска общност, стана достъпен в търговски реализации като IBM DB2 и Oracle. Релационният модел на данни определя данни, съхранявани в отношения които имат някои отношения сред тях (оттук и името релационни ).
В релационни бази данни като Sybase, MySQL, Oracle, IBM DB2, MS SQL Server и MS Access, данните се съхраняват в таблици съставен от една или повече колони (Access извиква колона поле ). Данните, съхранявани във всяка колона, трябва да са от един тип данни като символ (понякога наричан „низ“), число или дата. Колекция от стойности от всяка колона на таблица се нарича запис или ред в таблицата.
Различните таблици могат да имат една и съща обща колона. Тази функция се използва за изрично указване на връзка между две таблици. Стойностите, които се показват в колона А в една таблица, се споделят с друга таблица.
По-долу са дадени два примера за таблици в релационна база данни за локална банка:
Таблица с клиенти
| ИД на клиента | Име | Фамилия | Уличен адрес | Град | Щат | Zip |
|---|---|---|---|---|---|---|
| Номер | Характер | Характер | Характер | Характер | Характер | Характер |
| 1001 | Джоузеф | Смит | 123 Лексингтън | Смитвил | KY | 91232 |
| 1002 | Алберта | Джоунс | 12 Davis Ave. | Смитвил | KY | 91232 |
| 1003 | Натаниал | Брадва | 443 Grinder Ln. | Бродвил | GA | 81992 |
| 1004 | Паулина | Строител | 661 Parker Rd. | Стрийтвил | GA | 81990 |
Таблица с акаунти
| ИД на клиента | Номер на акаунт | Тип акаунт | Дата на отваряне | Баланс |
|---|---|---|---|---|
| Номер | Номер | Характер | Дата | Номер |
| 1001 | 9987 | Проверка | 10/12/1989 | 4000.00 |
| 1001 | 9980 | Икономии | 10/12/1989 | 2000.00 |
| 1002 | 8811 | Икономии | 01/05/1992 | 1000,00 |
| 1003 | 4422 | Проверка | 12/01/1994 | 6000.00 |
| 1003 | 4433 | Икономии | 12/01/1994 | 9000.00 |
| 1004 | 3322 | Икономии | 22.08.1994 г. | 500,00 |
| 1004 | 1122 | Проверка | 13.11.1988 г. | 800,00 |
Таблицата Customer има 7 колони (CustomerID, First Name, Last Name, Street Address, City, State и Zip) и 4 реда (или записи) с данни. Таблицата „Сметки“ има 5 колони (CustomerID, AccountNumber, AccountType, DateOpened и Balance) със 7 реда данни.
Всяка от колоните отговаря на един от трите основни типа данни :Знак, номер или дата. Типът данни за колона показва типа стойности на данни, които могат да се съхраняват в тази колона.
- Число – може да съхранява само числа, вероятно с десетична запетая. Може да бъде положителен или отрицателен.
- Символ – може да съхранява цифри, букви и пунктуация. Access извиква този тип данни Текст .
- Дата – може да съхранява само данни за дата и час.
В някои реализации на база данни съществуват други типове данни, като например изображения (за снимки или други данни). Въпреки това, горните три типа данни се използват най-често.
Обърнете внимание, че двете таблици споделят колоната CustomerID и че стойностите на колоната CustomerID в таблицата Customer са същите като стойностите в колоната CustomerID в таблицата Accounts. Тази връзка ни позволява да уточним, че клиентът Nathanial Axe има разплащателна и спестовна сметка, които са открити в един и същи ден:1 декември 1994 г.
Друго име, дадено на такава връзка, е Master/Detail . При връзка главен/подробност, един главен запис (като Клиент 1003, Nathanial Axe) може да има много подробни записи (двата акаунта), свързани с него.
При връзка главен/подробен е възможно главен запис да съществува без никакви подробности. Въпреки това е невъзможно да имате подробен запис без съвпадащ главен запис. Например, клиентът може да няма непременно никаква информация за акаунта изобщо. Въпреки това, всяка информация за акаунта трябва да бъде свързан с един клиент.
Всяка таблица също трябва да има специална колона, наречена Ключ който се използва за уникално идентифициране на редове или записи в таблицата. Стойностите в ключова колона (или колони) не може никога да се дублират. В горните таблици CustomerID е ключът за таблицата Customer, докато AccountNumber е ключът за таблицата Accounts.
3 Бизнес пример
В този раздел ще очертаем бизнес пример, който ще бъде използван като основа за примерите в целия урок. В организациите работата по анализиране на бизнеса и определяне на подходящата структура на базата данни (таблици и колони) обикновено се извършва от Системни анализатори . Системен анализатор ще събере информация за това как работи бизнесът и ще създаде модел на изискванията за съхранение на данни. От този модел програмист на база данни ще създаде таблиците на базата данни и след това ще работи с разработчиците на приложения, за да разработи останалата част от приложението на базата данни.
За този урок ще разгледаме обикновен банков бизнес. Банката има много клиенти, които откриват и поддържат една или повече сметки. За всеки клиент поддържаме запис на неговото име и адрес. Ние също им присвояваме уникален CustomerID. Ние присвояваме този уникален идентификатор както за удобство, така и за точност. Много по-лесно е да идентифицирате един клиент, използвайки неговия CustomerID, вместо да търсите пълното му име и адрес. Освен това е възможно банката да има двама клиенти с едно и също име (напр. Бил Смит). В такива случаи уникалният CustomerID винаги може да се използва за разграничаването им.
По подобен начин на всички сметки се присвоява уникален номер на сметката. Сметката може да бъде разплащателна или спестовна сметка. Спестовните сметки печелят лихва, но единствените разрешени транзакции са депозити и тегления. Разплащателните сметки не носят лихва. Поддържаме датата на откриване на сметката. Това ни помага да проследяваме нашите клиенти и може да бъде полезно за маркетингови цели. И накрая, поддържаме текущото салдо на сметка.
В предишния раздел дадохме структурата и някои примерни данни за таблицата „Клиент“ и таблицата „Сметки“. Те ще бъдат използвани за поддръжка на частта за съхранение на данни на нашето банково приложение.
Приложения за бази данни
Във всяко приложение на база данни всяка от таблиците изисква средства за вкарване на данни в тях и за извличане и промяна на данните в по-късен момент. Основният начин за въвеждане на данни в таблици е използването на формуляри за въвеждане на данни. Основните начини за връщане на данни от таблици или за показване на данни в таблици са използването на заявки или отчети. В пълно приложение за база данни, всички формуляри и отчети са свързани заедно във формуляр за навигация – една страница, която ще има връзки към всяка от частите на приложението. Едно голямо приложение за база данни може да има десетки формуляри и отчети за въвеждане на данни.
За този урок ще създадем формуляр за въвеждане на данни за всяка таблица, заявка за всяка таблица и отчет за всяка таблица.
В следващите раздели първо ще представим как да стартирате Access и как да създадете нова база данни.
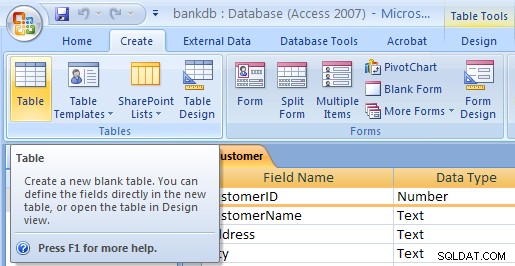
4 Стартиране на Microsoft Access
Както при повечето програми за Windows, Access може да се изпълни чрез навигиране в менюто "Старт" в долния ляв ъгъл на работния плот на Windows.
За да стартирате Access, щракнете върху бутона Старт, след това върху менюто Програми, след това преминете към менюто на Microsoft Office и накрая щракнете върху елемента от менюто на Microsoft Access. Менюто на MS Office Professional е показано по-долу.
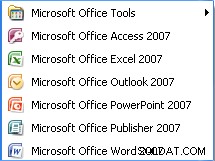
Имайте предвид, че това подреждане на менютата може да варира в зависимост от това как MS Office е инсталиран на компютъра, който използвате.
След като Access стартира, ще се покаже начален екран:
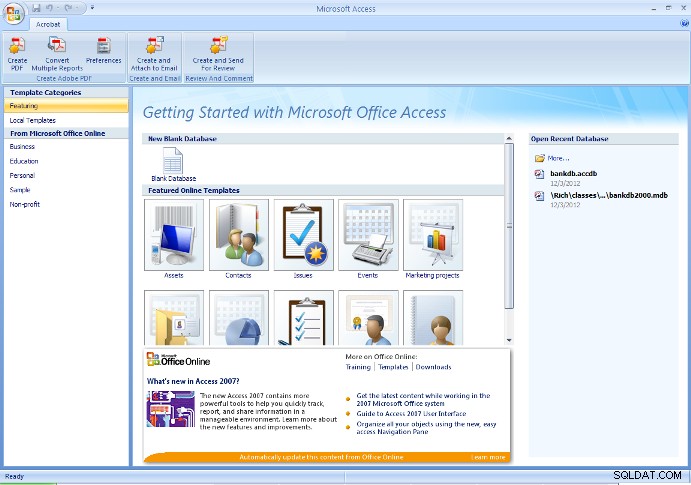
От този начален екран потребителят може да създаде нова база данни (или празна, или с някои таблици, създадени със съветника за база данни) или да отвори съществуваща база данни.
Като цяло, когато човек започва проект за първи път, трябва да се създаде нова празна база данни. След този момент използвайте Отваряне на съществуваща база данни опция за повторно отваряне на създадената по-рано база данни.
Предупреждение – Ако преди това сте създали база данни и след това я създадете отново със същото име, ще презапишете всяка извършена работа.
За целите на този урок, ако преминавате през тези стъпки за първи път, изберете опцията за създаване на нова, празна база данни, както е показано на фигурата по-горе.
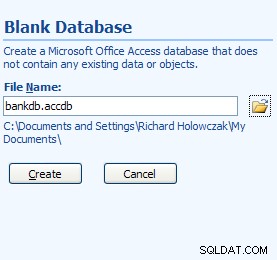
В Access 2007 щракнете върху кръглия бутон Office в горния ляв ъгъл и изберете New от падащото меню. Попълнете Име на файл като bankdb.accdb и щракнете върху бутона Създаване, за да създадете базата данни, както е показано на фигурата по-долу.
Нов екран на база данни за Access 2007
В горното име на файла bankdb е името, избрано за тази конкретна база данни, а .accdb е разширението на името на файла, дадено за Microsoft DataBase 2007, 2010 и 2013 файлове.
Препоръчително е името на базата данни (bankdb в горния пример) да е сравнително кратко и да не се използват интервали или други пунктуационни знаци в името на базата данни. Също така името на базата данни трябва да отразява съдържанието на базата данни.
След като бъде създадена новата база данни, ще се появи следният главен екран за достъп:
Оформлението на екрана за MS Access 2007 е значително различно от предишните версии. Повечето от разделите в горната част на екрана са пренаредени. Освен това основният екран по подразбиране след създаване на нова база данни автоматично превключва към изгледа за проектиране, за да създаде нова таблица.
Следните раздели ще се появят в горната част на екрана:
- Раздел Начало – Контроли за промяна на шрифтове, изпълнение на заявки, копиране/поставяне/изрязване на данни и др.
- Раздел „Създаване“ – Контроли за създаване на таблици, формуляри, отчети и др.
- Раздел Външни данни – Контроли за зареждане на данни от други източници на данни в MS Access.
- Раздел Инструменти за база данни – Контроли за управление на бази данни (сигурност, комутатор и др.)
- Раздел „Дизайн“ – Това ще се появи при проектиране на нова таблица, формуляр, отчет и т.н.
Имайте предвид, че интерфейсите за Access 2007, 2010 и 2013 са сходни, въпреки че версията, която използвате, може да изглежда малко по-различна от снимките, включени в този урок.
4.1 Преглед на стартиране на Microsoft Access
За да стартирате Microsoft Access:
- Използвайте бутона Старт в лентата на задачите, за да отворите:Програми -> MS Office -> Microsoft Access
- За да създадете нова база данни, изберете Празна база данни и посочете ново име на файл за базата данни. Не забравяйте да използвате описателно име за новата база данни. Щракнете върху бутона OK, за да създадете новата база данни.
- За да отворите съществуваща база данни, изберете Отваряне на съществуваща база данни , маркирайте Още файлове... и щракнете върху бутона OK. След това отидете до устройството, маркирайте съществуващия файл с база данни на твърдия диск или USB устройството и щракнете отново върху бутона OK, за да отворите базата данни.
За да излезете от Access, издърпайте надолу менюто Файл (или менюто Office) и изберете елемента от менюто Изход.
5 Създаване и преглед на таблици
Таблиците са основните единици за съхранение на данни в Access. Припомнете си, че таблицата се състои от една или повече колони (или полета ) и че дадена колона може да се появи в повече от една таблица, за да посочи връзка между таблиците.
От бизнес примера, обсъден по-рано, стигнахме до заключението, че две таблици биха били достатъчни за съхраняване на данните за Клиенти и техните банкови сметки . Сега даваме инструкции стъпка по стъпка за създаване на тези две таблици в Access.
Има няколко начина за създаване на таблица в Access. Access предоставя магьосници които насочват потребителя през създаването на таблица, като предлагат имена за таблици и колони. Другият основен начин за създаване на таблица е с помощта на Design View за да дефинирате ръчно колоните (полета) и техните типове данни.
Докато използването на съветниците е бърз начин за създаване на таблици, потребителят има по-малко контрол върху имената на колоните (полета) и типовете данни. В този урок ще опишем стъпките за създаване на таблица с помощта на Design View . Учениците се насърчават да експериментират сами с помощта на съветника за създаване на таблица.
5.1 Създаване на таблица с помощта на изгледа за проектиране
За да създадете таблица в Access с помощта на изгледа за проектиране, изпълнете следните стъпки:
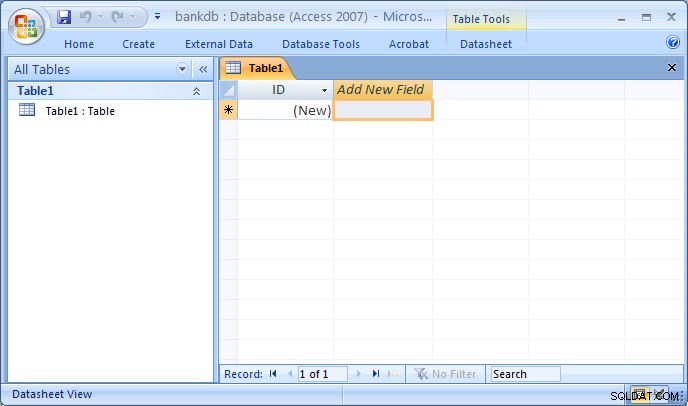
- В Access 2007, 2010 и 2013 разделът „Създаване на нова таблица“ вече трябва да е маркиран и да е създадена нова таблица с име table1. Ако това не е така, щракнете върху Създаване раздела и щракнете върху Таблица икона. След това издърпайте надолу Изглед меню и изберете Изглед на дизайн .

- Ще се появи изгледът за проектиране на таблица. Попълнете Име на поле , Тип данни и Описание за всяка колона/поле в таблицата. Полето CustomerID се попълва по-долу:
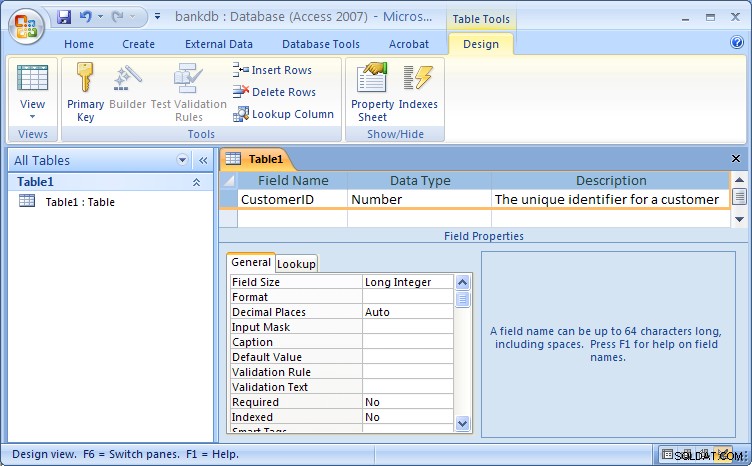
Изглед на дизайн на таблица за Access 2007Имайте предвид, че името по подразбиране, дадено за таблицата, е Таблица1 . В по-късна стъпка ще зададем подходящо име за тази таблица.
Попълнете информацията за полетата, както следва:
Име на поле Тип данни Описание ИД на клиента Номер Уникалният идентификатор за клиент Име Текст Собственото име на клиента Фамилия Текст Фамилията на клиента Уличен адрес Текст Улицата на клиента Град Текст Градът на клиента Щат Текст Държавата на произход на клиента Цип Текст Пощенският код на клиента По-долу е дадена фигура, показваща изгледа на дизайна с попълнена дефиниция на новата таблица:

Следващата стъпка е да дефинирате ключа за таблицата и да запишете таблицата.
- Сега, когато всички полета са дефинирани за таблицата, трябва да бъде дефиниран първичен ключ. Припомнете си, че първичният ключ ще се използва за уникално идентифициране на запис в таблицата (в този случай клиент). Маркирайте CustomerID поле и щракнете върху бутона Първичен ключ в лентата с бутони
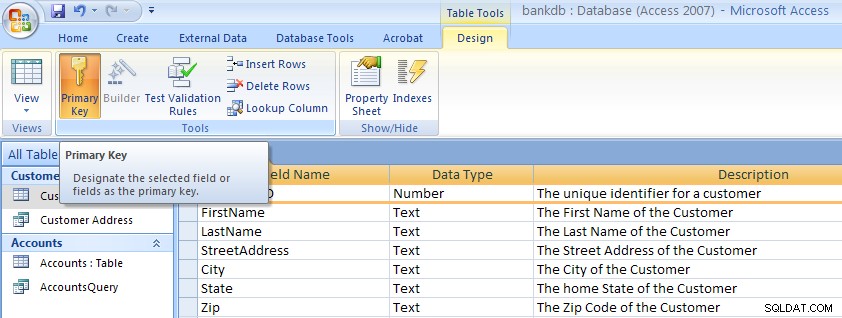 Забележете, че до името на полето от лявата страна се появява малък ключ. Забележка:За да премахнете първичен ключ , просто повторете тази процедура, за да изключите първичния ключ.
- Като последна стъпка таблицата трябва да бъде запазена. Издърпайте надолу менюто Office и изберете елемента от менюто Запиши като. Ще се появи диалогов прозорец, където трябва да се посочи името на новата таблица. Имайте предвид, че Access дава име по подразбиране, като Таблица1 или Таблица2 . Просто въведете това име по подразбиране с името на таблицата. За този пример наименувайте таблицата:Клиент След това щракнете върху бутона OK.
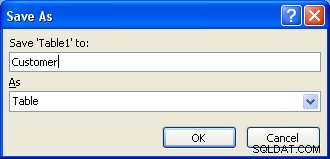
В този момент новата таблица с клиенти е създадена и запазена.
Забележка относно именуването на полета (колони) в MS Access
Когато дефинирате полетата (колони) за таблица, е важно да използвате имена на полета, които дават ясно разбиране на съдържанието на данните в колоната. Например, полето CNO посочва ли клиентски номер или номер на контейнер?
Имената на полета в Access могат да бъдат дълги до 64 знака и могат да съдържат интервали. Въпреки това, използването на интервали в имената на полета и имената на таблици е силно нежелателно . Ако искате да направите имената на полета по-лесни за четене, помислете за използването на знак за долно подчертаване за разделяне на думите. Уверете се обаче, че не се появяват интервали преди или след долното черта.
Следната таблица обобщава някои различни начини за даване на имена на полета:
| Описание | Лош | Добре |
|---|---|---|
| Уникален идентификатор за клиент | CID | CustomerID или Customer_ID |
| Описание за продукт | PDESC | Описание на продукта |
| Домашният телефонен номер на служителя | Домашен_телефонен_номер_на_служител | Домашен телефон |
| Номер на банкова сметка | BA# | Номер на акаунт |
5.2 Упражнение:Създаване на таблица
Създайте Акаунти таблица, като следвате същите стъпки, използвани за създаване на таблицата на клиентите.
- Щракнете върху раздела Създаване и след това щракнете върху Таблица бутон.
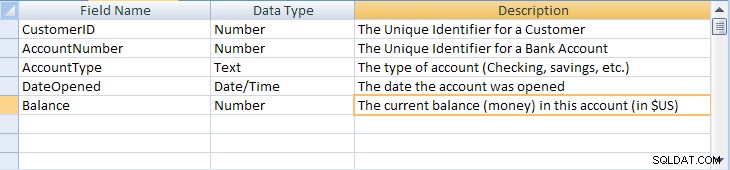
- Издърпайте надолу менюто Изглед и изберете Дизайн. Ще се появи изгледът за проектиране на таблица. Попълнете Име на поле , Тип данни и Описание за всяка колона/поле в таблицата „Сметки“.
Име на поле Тип данни Описание ИД на клиента Номер Уникалният идентификатор за клиент Номер на акаунт Номер Уникалният идентификатор за банкова сметка Тип акаунт Текст Типът на сметката (чекова, спестовна и т.н.) Дата на отваряне Дата Дата на откриване на сметката Баланс Номер Текущото салдо (пари) в тази сметка (в $US) По-долу е дадена фигура, показваща изгледа на дизайна с попълнена дефиниция на новата таблица:
- Дефинирайте първичен ключ за таблицата „Сметки“. Кликнете върху Номер на акаунт поле с Дясно бутон на мишката и изберете Първичен ключ от изскачащото меню.
- Запазете новата таблица „Сметки“, като издърпате менюто „Файл“ и изберете елемента от менюто „Запазване“. Попълнете името на таблицата:Акаунти След това щракнете върху бутона OK.
Имайте предвид, че има редица допълнителни стъпки, които човек може да предприеме, за да подобри и разкраси таблиците в MS Access, включително посочване на стойности по подразбиране, създаване на стойности за търсене и маскиране на въведени данни, за да следват определен модел. Подробностите не са важни за настоящия урок, но ако се интересувате, вижте страницата Advanced MS Access Table Design, свързана тук.
5.3 Преглед и добавяне на данни към таблица
Данните могат да се добавят, изтриват или променят в таблици с помощта на прост дисплей, подобен на електронна таблица. За да изведете този изглед на данните на една таблица, маркирайте името на таблицата и след това щракнете двукратно върху името на таблицата.
В този изглед на таблицата на клиентите, показан на фигурата по-долу, полетата (колоните) се появяват в горната част на прозореца, а редовете или записите се появяват отдолу. Този изглед е подобен на начина, по който ще бъде проектирана електронна таблица.
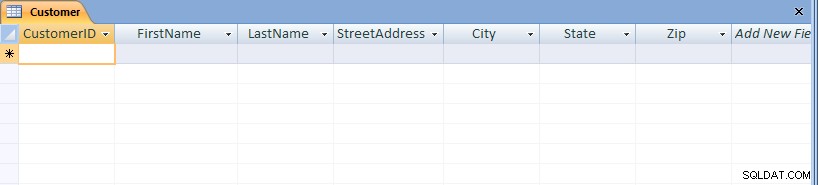
Забележете, че в долната част на прозореца се показва броят на записите. В този случай, тъй като таблицата току-що е създадена, се появява само един празен запис.
За да добавите данни към таблицата, просто въведете стойности за всяко от полетата (колони). Натиснете клавиша Tab, за да се придвижвате между полета в рамките на запис. Използвайте клавишите със стрелки нагоре и надолу, за да се придвижвате между записи. Въведете данните, както са дадени по-долу:
| ИД на клиента | Име | Фамилия | Уличен адрес | Град | Щат | Zip |
|---|---|---|---|---|---|---|
| 1001 | Джоузеф | Смит | 123 Лексингтън | Смитвил | KY | 91232 |
| 1002 | Алберта | Джоунс | 12 Davis Ave. | Смитвил | KY | 91232 |
| 1003 | Натаниал | Брадва | 443 Grinder Ln. | Бродвил | GA | 81992 |
| 1004 | Паулина | Строител | 661 Parker Rd. | Стрийтвил | GA | 81990 |

За да запазите новите данни, издърпайте надолу менюто на Office и изберете Save.
За да навигирате до други записи в таблицата, използвайте лентата за навигация в долната част на екрана:
За да промените съществуващите данни, просто отидете до записа, който ви интересува, и разделете с раздела до съответното поле. Използвайте клавишите със стрелки и клавишите Delete или Backspace, за да промените съществуващите данни.
За да изтриете запис, първо отидете до записа, който ви интересува. След това издърпайте надолу менюто Редактиране и изберете елемента от менюто Изтриване.
За да затворите таблицата и да се върнете към главния екран на Access, издърпайте надолу менюто Файл и изберете елемента от менюто Close.
5.4 Упражнение:Добавяне на данни към таблица
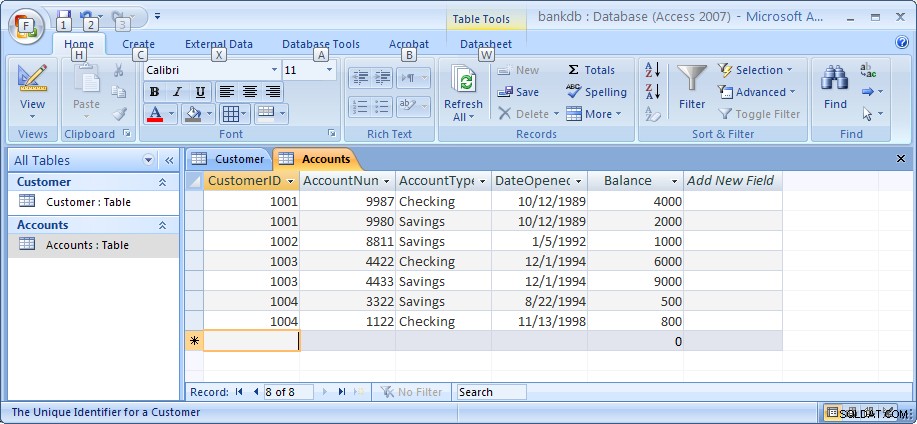
За това упражнение отворете таблицата „Сметки“ и добавете данни за седемте акаунта, показани в раздел 2. Уверете се, че сте въвели данните точно както е показано, включително главните букви на данните в полето AccountType. например, въведете Спестявания вместо спестявания или СПЕСТЕНИ.
Имайте предвид, че когато въвеждате датите, въведете пълните четири цифри за годината. По подразбиране Access показва всички 4 цифри на годината (по-старата версия на Access показва само две цифри).
Не забравяйте да запазите данните, когато сте готови. Фигурата по-долу показва таблицата с акаунти и данните, както трябва да изглеждат, когато приключите с това упражнение.
На този етап от урока създадохме две таблици, Клиенти и акаунти, и добавихме данни към всяка една. В следващите раздели ще разгледаме как да правим заявки и да докладваме за данните в таблиците и как да създадем удобен за потребителя формуляр за въвеждане на данни с помощта на съветниците на Access.
Забележка:Моят урок за MS Access Advanced Table Design може да бъде намерен на тази връзка. Може да искате да проверите това, след като завършите останалата част от този урок.
5.5 Създаване на връзки между таблици
Припомнете си, че една от основните характеристики на релационните бази данни е фактът, че всички таблици са свързани една с друга. В базата данни на Банката досега таблицата Клиенти е свързана с таблицата Сметки по силата на полето CustomerID, което се появява и в двете таблици. Access има средство да направи тази връзка изрична с помощта на екрана Връзки. Access използва тази информация при проектирането на отчети, формуляри и заявки, които изискват показване на повече от една таблица.
За да започнете, уверете се, че таблицата „Сметки“ и таблицата „Клиент“ са затворени. Достъпът ще спре създаването на всякакви връзки, ако таблицата е отворена в момента. За да затворите таблица, щракнете с десния бутон върху името на таблицата в раздела над таблицата и изберете елемента от менюто за затваряне, или щракнете върху малкия X точно над таблицата.

След това покажете екрана Връзки, като щракнете върху раздела Инструменти за база данни и след това щракнете върху бутона Връзки, както е показано по-долу. 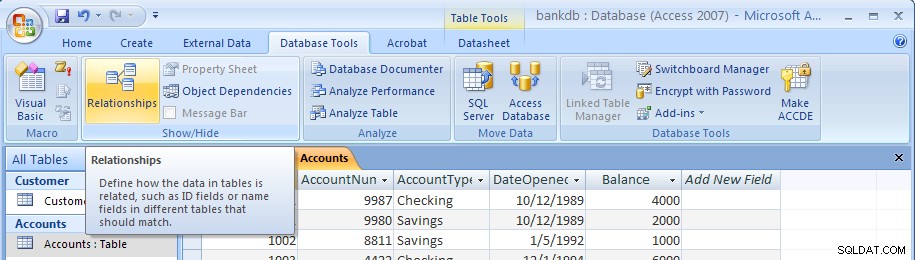
Празният екран Връзки ще се появи, както следва:
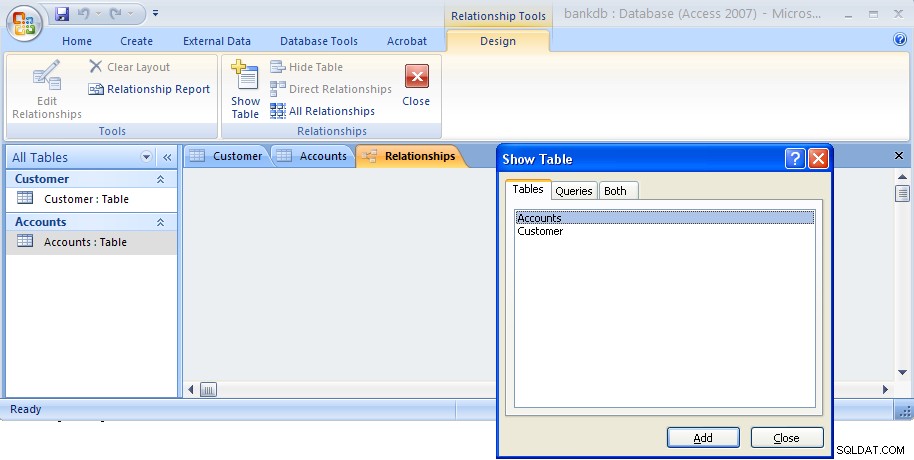
Диалоговият прозорец Покажи таблица ще се появи по подразбиране. Маркирайте както таблицата Клиенти, така и таблицата Сметки, както е показано по-долу и след това щракнете върху бутона Добавяне.

След това щракнете върху бутона Затвори, за да затворите този диалогов прозорец. Екранът за връзки сега ще се появи отново с двете таблици, показани по-долу:
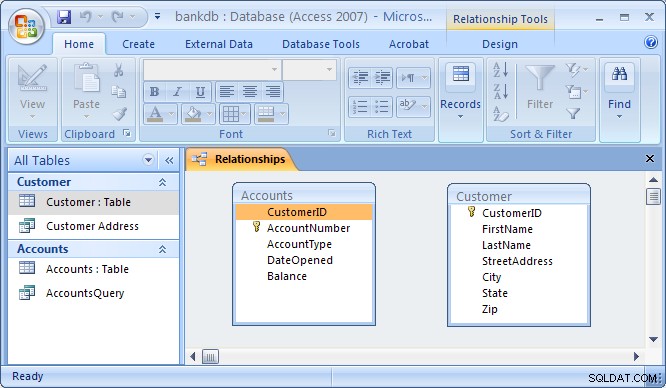
За да свържете таблицата Клиенти с таблицата Сметки, за да образувате връзка, щракнете върху полето CustomerID в таблицата Customers и го плъзнете над полето CustomerID в таблицата Accounts. След като отпуснете бутона на мишката, диалоговият прозорец Редактиране на връзки ще се появи, както следва:
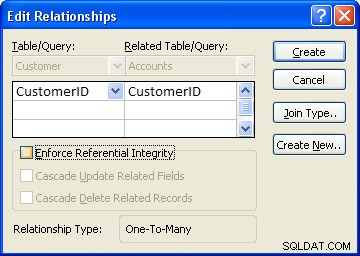
Access ще направи всичко възможно, за да определи типа на връзката (почти винаги ще избере Един към много ). За този пример Access знае, че CustomerID е ключ от таблицата Customer, така че избира това поле като страна „Едно“. This makes the Accounts table the “Many” side as One customer may have Many accounts.
One additional step to be taken is the check off the box labeled “Enforce Referential Integrity”. This option puts constraints into effect such that an Accounts record can not be created without a valid Customer record, and Access will also prevent a user from deleting a Customer record if a related Accounts record exists. At this point, click on the Create button to create the relationship. The Relationships screen should reappear with the new relationship in place as follows:
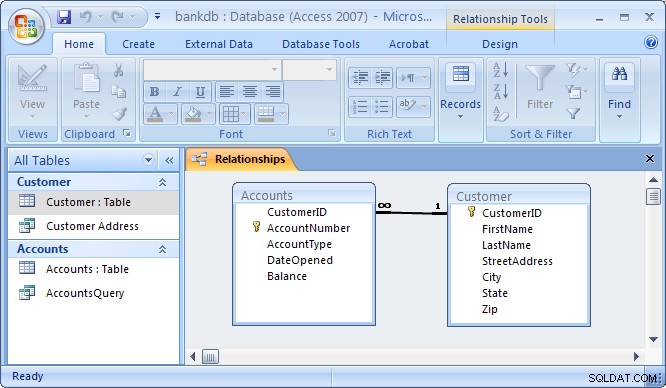
Note the symbols “1” (indicating the “One” side) and the infinity symbol (indicating the “Many” side) on the relationship. Close the relationships screen and select Yes to save the changes to the Relationships layout.
If the relationship does not appear in the above fashion, highlight it and press the delete key to delete it. Then go back to the table design view and make certain that the CustomerID field is designated as the key of the Customers table. Then go back to the Relationships screen and try to recreate the relationship.
5.6 Review of Creating and Viewing Tables
Creating a new table requires the following steps:
- Click on the Tables tab on the Access main screen
- Click on the New button.
- Choose the Design View and click the OK button.
- Fill in the name, data type and description of each of the fields in the table.
- Designate a primary key by clicking on one of the fields with the right mouse button and then choose Primary Key from the pop-up menu.
- Save the table by pulling down the File menu and choosing Save.
- Close the new table by pulling down the File menu and choosing Close.
To change the design of an existing table (e.g., to add, change or delete a field):
- Click on the Tables tab on the Access main screen
- Highlight the name of the table to be modified and click on the Design button.
- Make the necessary changes.
- Save the table by pulling down the File menu and choosing Save.
- Close the table by pulling down the File menu and choosing Close.
To add, delete or change data in an existing table:
- Click on the Tables tab on the Access main screen
- Highlight the name of the table to be modified and click on the Open button.
- Make the necessary changes to the data.
- Save the table data by pulling down the File menu and choosing Save.
- Close the table by pulling down the File menu and choosing Close.
To create or edit relationships between tables:
- Pull down the Tools menu and select the Relationships menu item.
- To display tables, right click and choose Add Tables
- To create new relationships, drag a key field from one table and drop it on the associated field in another table
- To edit an existing relationship, double click on the relationship line.
- To delete an existing relationship, click on the relationship line and press the delete key.
6 Creating and Running Queries
Queries are a fundamental means of accessing and displaying data from tables. Queries can access a single table or multiple tables. Examples of queries for our bank database might include:
- Which Customers live in Georgia ?
- Which Accounts have less than a $500 balance ?
- What is the total amount of money deposited by each Cusomter?
- Which Checking account has the largest balance?
Queries can be used to carry out other tasks such as for creating formatted reports and data entry forms, and for exporting subsets of data to Excel or another software program.
In this section, we show how to use the Access Wizards to create queries for a single table and for multiple tables.
6.1 Single Table Queries
In this section, we demonstrate how to query a single table. Single table queries are useful to gain a view of the data in a table that:
- only displays certain fields (columns) in the output
- sorts the records in a particular order
- performs some statistics on the records such as calculating the sum of data values in a column or counting the number of records, or
- filters the records by showing only those records that match some criteria. For example, show only those bank customers living in GA.
Creating a query can be accomplished by using either the query design view or the Query wizard. In the following example, we will use the query wizard to create a query.
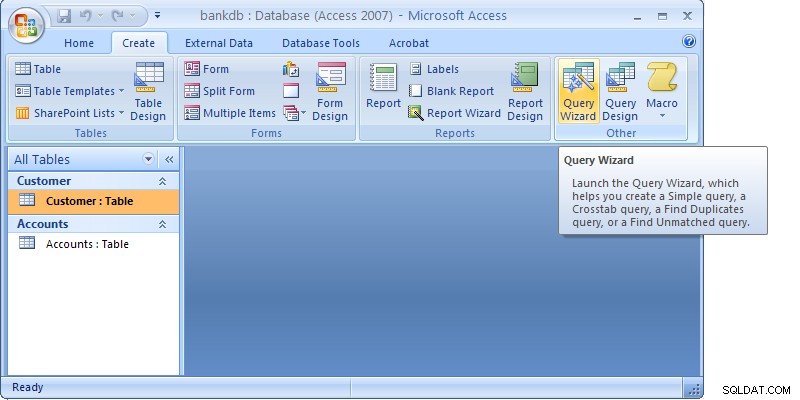
To create a new query, click on the Create tab. Then click on the Query wizard button.
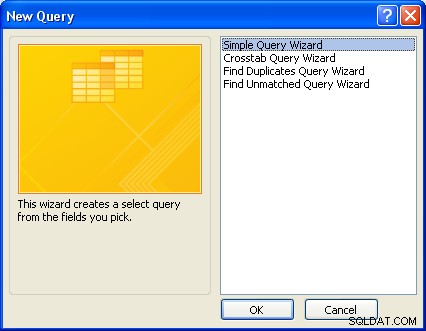
When the Query wizard appears, highlight the Simple Query Wizard selection and click on the OK button.
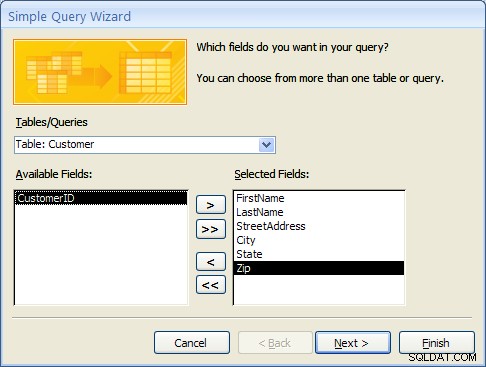
The first step in the Simple Query wizard is to specify the table for the query and which fields (columns) should be displayed in the query output. Three main sections of this step are:
- Tables/Queries – A pick list of tables or queries you have created.
- Available Fields – Those fields from the table that can be displayed.
- Selected Fields – Those fields from the table that will be displayed.
For this example, pull down the Tables/Queries list and choose the Customer table. Notice that the available fields change to list only those fields in the Customer table. This step is shown below:

From the list of Available fields on the left, move the FirstName, LastName, StreetAddress, City and State fields over to the Selected Fields area on the right. Highlight one of the fields and then click on the right arrow button  in the center between the two areas. Repeat this for each of the four fields to be displayed. When done with this step, the wizard should appear as below:
Click on the Next button to move to the next and final step in the Simple Query wizard.
In the final step, give your new query a name. For this example, name the query:Customer Address
At this point, the wizard will create the new query with the option to either:
- Open the query to view information – that is, the wizard will execute the query and show the data.
- Modify the query design – the wizard will switch to the Design View to allow further modification of the query.
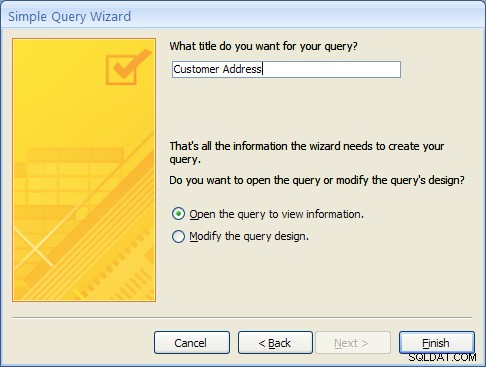
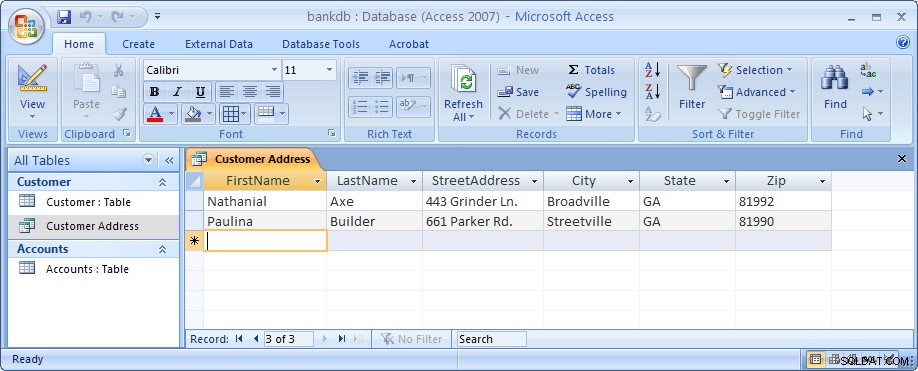
For this example, choose Open the query to view information and click on the Finish button. When this query executes, only the customer’s name, address, city and state fields appear, however, all of the rows appear as shown in the figure below:

Close this query by clicking on the X in the upper right corner of the query results as shown in the figure below:
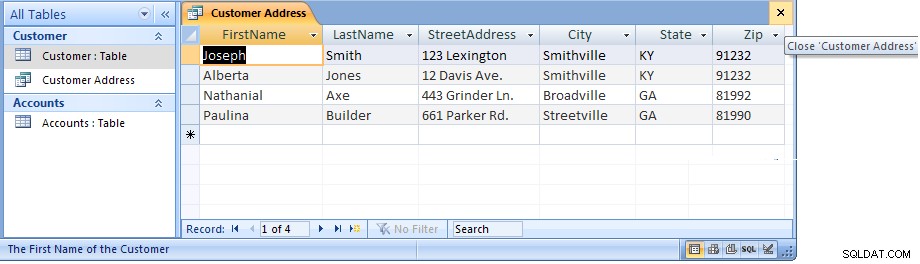
The Access main screen showing the Queries tab should appear. Note the new query Customer Address appears under the Customers table.
6.1 Single Table Queries (Continued)
In the following example, we will modify the Customer Address query to only display customers in a certain state. To accomplish this, we will make use of the Query Design View.
Open up the Customer Address query in the design view by right-clicking on the name of the query. Then select the Design View menu item as shown below.
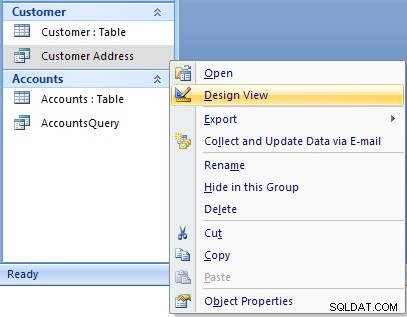
The design view will appear as in the figure below:
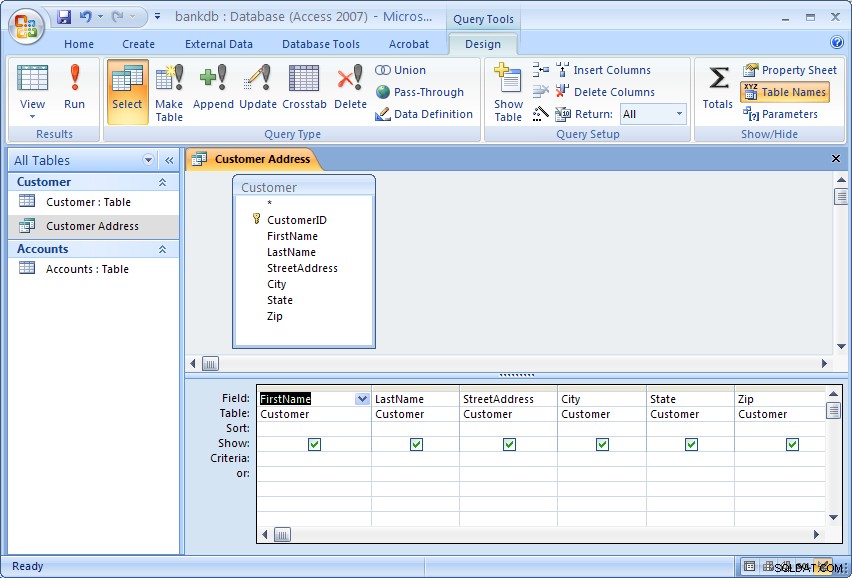
The Query Design view has two major sections. In the top section, the table(s) used for the query are displayed along with the available fields. In the bottom section, those fields that have been selected for use in the query are displayed.
Each field has several options associated with it:
- Field – The name of the field from the table
- Table – The table the field comes from
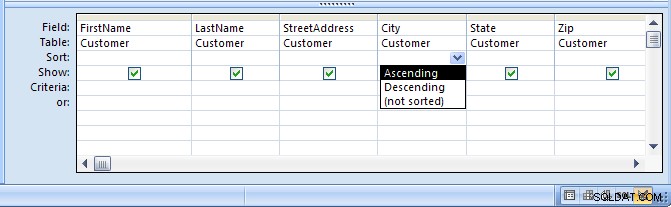
- Sort – The order in which to sort on this field (Ascending, Descending or Not Sorted)
- Show – Whether or not to display this field in the query output
- Criteria – Indicates how to filter the records in the query output.
For this example, we will filter the records to only display those customers living in the State of Georgia (GA). We will also sort the records on the City field.
To sort the records on the City field, click in the Sort area beneath the City поле. Choose Ascending from the list as shown in the figure below:
To filter the output to only display Customers in Georgia, click in the Criteria area beneath the State field and type the following statement: ='GA'
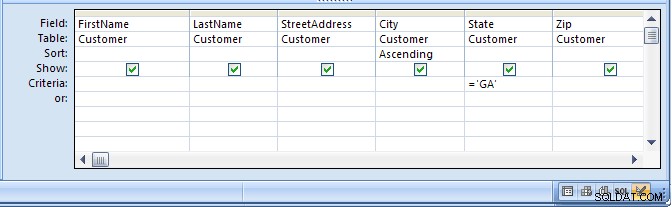
The ='GA' statement tells Access to only show those records where the value of the State field is equal to ‘GA’. Note the use of single quotes to surround the characters.
Run the query by clicking on the Run button (with the large red exclamation point). The output is shown in the figure below:
Finally, save and close this query to return to the Access main screen.
6.2 Exercise:Single Table Queries
For this exercise, use the Simple Query wizard to create a query on the Accounts table showing just the AccountNumber, AccountType and Balance fields.
- From the Access main screen, click on the Create tab. Then click on the Query Wizard button.
- Choose the Simple Query wizard option and click on the OK button.
- Under Table/Queries:choose the Accounts table. Then move the AccountNumber, AccountType and Balance fields over to the Selected fields area. Then click the Next button.
- In the next panel, you will be asked to choose between a detail or summary query. Choose detailed query and click on the Next button.
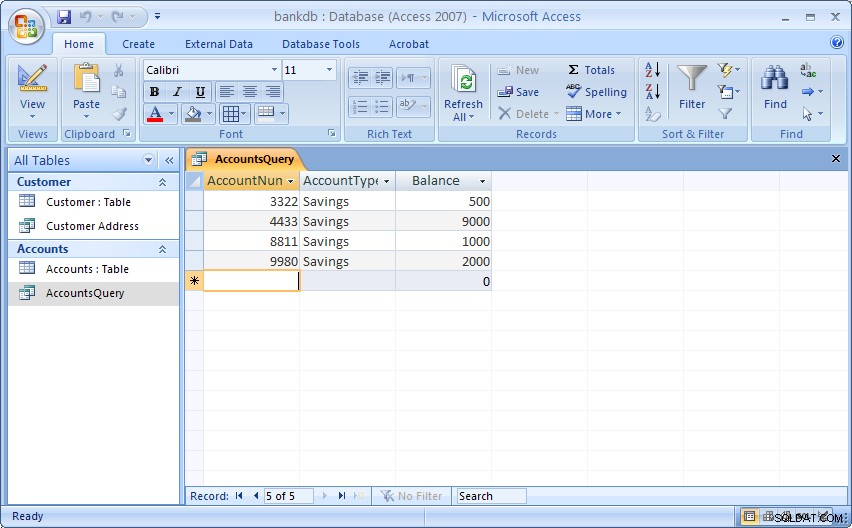
- Name the new Query :AccountsQuery and click on the Finish button.
The output is shown below:

Close this query by pulling down the Office menu and choosing Close.
In the next part of the exercise, we will modify the query to sort the output on the account number and only display the Savings accounts.
- From the Queries tab on the Access main screen, highlight the AccountsQuery and click on the Design button.
- Change the Sort order for the AccountNumber field to Ascending.Add the following statement to the Criteria:are under the AccountType field:=‘Savings’
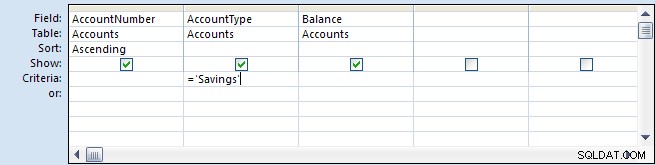
- Run the query by double-clicking on the AccountsQuery name. The output is shown below:
- Finally, save and close the query to return to the Access main screen.
6.3 Multiple Table Queries
Up to this point, queries involving only one table have been demonstrated. It is almost a given that queries will need to involve more than one table. For this example, assume that a manager would like to see a list of all of the customers and the type of account(s) that each one maintains at the bank. Such a query requires data from both the Customers table as well as the Accounts table. In such queries, Access will rely on the Relationships established between tables to guide how the data will be assembled to satisfy the query.
Before proceeding with these next instructions, make certain the One-to-Many relationship between the Customers and Accounts table has been created (see section 5.5 Creating Relationships for a review of this process).
To start the process of creating a multiple table query, highlight the Create tab and click on the Query Wizard button to create a new query. Select the “Simple Query Wizard” option as was done previously.
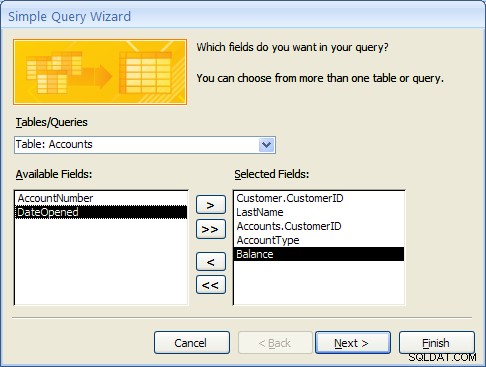
When the simple query wizard appears, select the CustomerID and LastName fields from the Customers table, then switch the Tables/Queries selection to the Accounts table and select the CustomerID, AccountType and Balance fields from the Accounts table. The result from this step is down below:
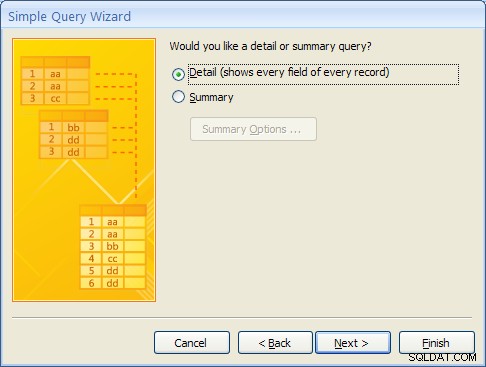
Click the Next button to continue. In the next step of the wizard, an option will appear to provide some level of Summary. For this example, leave the default at “Detail …” as shown below and then click on the Next button.
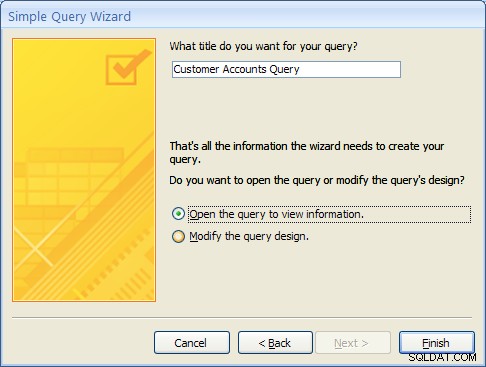
In the final step of the wizard, name the query “Customer Accounts Query” and click on the Finish button. The multiple table query results should appear as follows:
MS Access knows how to line up (or “join”) the accounts table to the Customer table for this query due to the relationship that was created when the tables were first defined.
As with single table queries demonstrated previously, one can change the query definition in design view by adding filters (e.g., show account information for all customers in ‘GA’).
6.4 Exercise:Multiple Table Queries
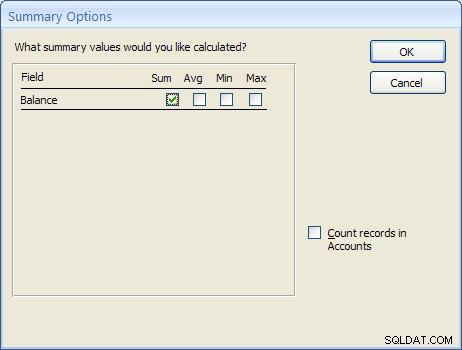
For this exercise, create a new query called “Accounts Summary Query” that joins the Customers table (include the CustomerID and LastName fields) with the Accounts table (include the Balance field only). In the second step of the wizard, click on the Summary choice (instead of Details) and then click on the Summary Options… button. Check off all of the Summary option boxes such as Sum , AVG , Min and Max as shown in the figure below:
The resulting query should appear as follows:
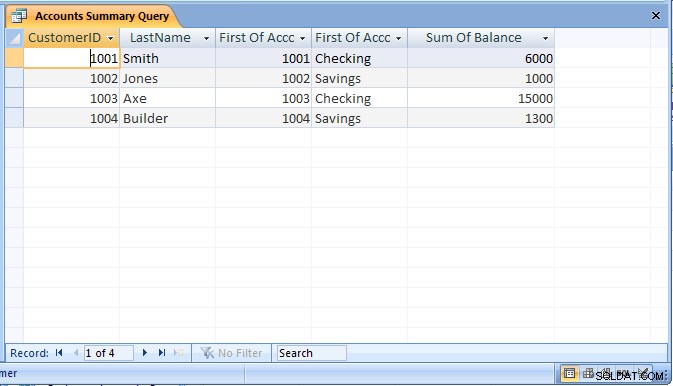
Be sure to save the query as “Accounts Summary Query”.
6.5 Review of Creating and Running Queries
In this section, the basic steps for creating and running queries were introduced. The query wizard can be used to create simple queries that access a single table. It is also possible to then modify the query to sort or filter the records.
Creating a query using the query wizard:
- From the Access main screen, click on the Queries tab. Then click on the New button.
- From the Queries tab on the main Access screen, click on the New button and choose the Simple Query wizard option.
- Under Table/Queries:choose the appropriate table for the query and then indicate which fields in the table will appear in the query output.If querying more than one table, change the Table/Queries:selection to display additional tables and select the necessary fields.
- If the table contains numeric fields, either detailed or summary information may be specified for the query.
- Finally, name the new query and click on the Finish button.
As a final note, Forms and Reports can be created based on existing queries.
7 Creating and Running a Data Entry Form
Data entry forms are the primary means of entering data into tables in the database. In a previous section, we described how to add data to a table using a spreadsheet-like view of the data. Data entry forms offer a more user-friendly interface by adding labels for each field and other helpful information.
Access provides several different ways of creating data entry forms. These include:
- Creating the forms by hand using a Design View
- Creating a default form based on all of the fields available in a table or a query
- Creating a form based on a number of different wizards that walk the user through the forms creation process.
As with queries, a data entry form can be based on a single table or it can work on multiple tables at the same time.
In this section, we cover the basic steps for using a wizard to create a data entry form based on a single table. After this exercise, a multiple-table form is demonstrated.
7.1 Creating a Single Table Form using the Wizard
In this example, we will create a simple data entry form for the Customer table. To begin the process, click on the Create tab on the Access main screen. As with the other components in Access, there are buttons for creating a New form, Open an existing form and Design an existing form. For this example, click on the New button to create a new form.
Several buttons for creating a new form will appear. For this tutorial, choose the Form wizard.
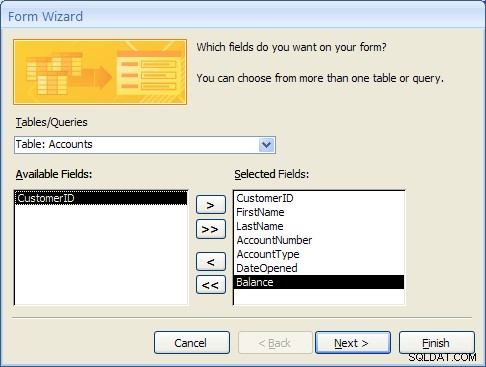
In the first step of the Form wizard, we need to specify the fields from the Customer table that will appear on the form. In this case, we want all of the fields to appear. Move each of the fields from the Available Fields side over to the Selected Fields side as in the following figure. Then click on the Next button.

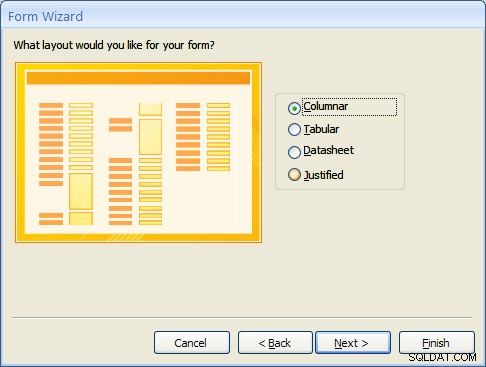
Forms can have several different layouts or arrangement of the labels and fields on the screen.
- Columnar – Places the labels to the left of each field. This is similar to a paper form. This layout is suitable for viewing data one record at a time.
- Tabular – Places the field labels at the top of the screen and the records are displayed below. This is similar to how a spreadsheet would display the data and is suitable for displaying multiple records of data at a time.
- Datasheet – The data appears in the same fashion as when viewing or adding data to a table.
- Justified – Places the labels above each field with the fields spread out on the form. This is suitable for viewing a single record at a time as with the columnar layout.
For this example, choose the columnar layout as shown in the figure below and click on the Next button.
At this point, MS Access 2007 and 2010/2013 versions are a bit different. Access 2007 will show several sample display styles that determine how the form will appear, including elements such as fonts, colors and the background used in the form. Access 2010 and 2013 skips this step in this wizard and provides styles that can be applied to the form in Design mode. For this example, for MS Access 2007, select the Office style as shown below and click on the Next button.

As a final step, give this new form the name:CustomerDataEntry and then click on the Finish button as shown below:
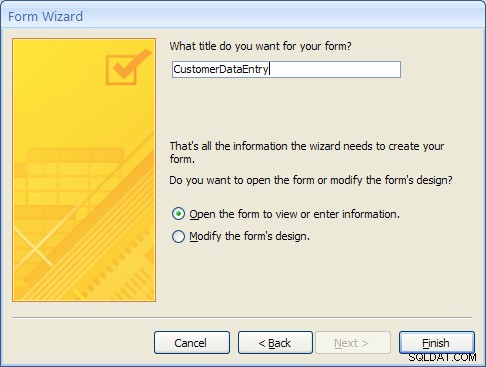
The new form will be created by the wizard and then opened. It should appear as in the figure below:
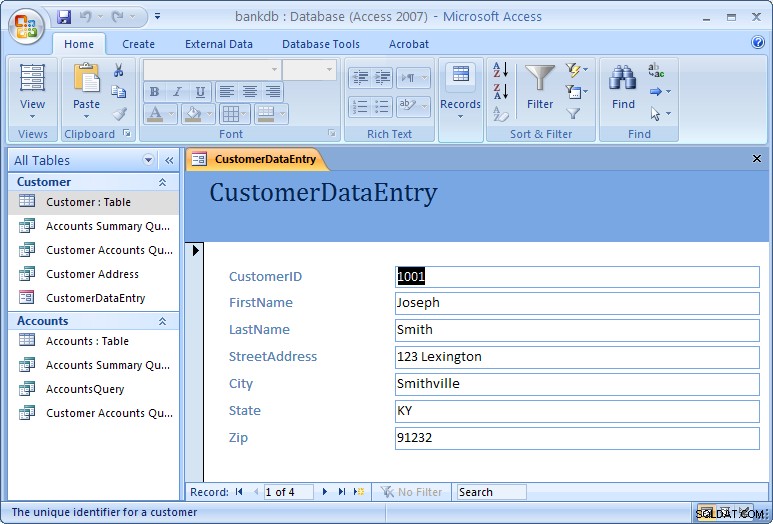
Use the tab key to navigate between fields in the form. To move to the next or previous record, use the record navigation bar at the bottom of the form:
The buttons on the navigation bar perform the following functions:
 | Go to the first record. |
 | Go to the previous record. |
 | Go to the next record. |
 | Go to the last record.  Go past the last record to add a new record. Go past the last record to add a new record. |
To close the form and return to the Access main screen, pull down the File menu and choose Close.
To open the form at any time, highlight the form name under the Forms tab on the Access main screen and click on the Open button.
One quick final note on forms. When the form is created, MS Access looks at how the table is designed and creates the form based on the properties of the table. If you make any changes to the table, you will need to re-create the form again in order to see those table changes reflected in the form. One example where this might happen is is if you change a column in your table from a text box to a combo box, or if you add or remove any columns from your table.
7.2 Exercise:Creating a Single Table Form
For this exercise, we will create a data entry form for the Accounts table created in a previous exercise.
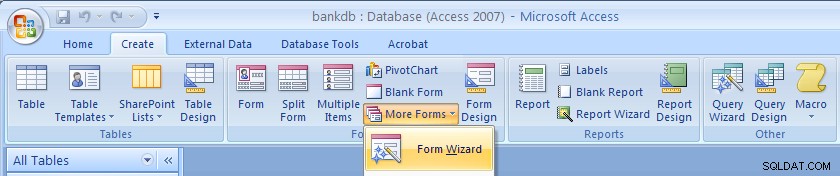
- Click on the Create tab on the Access main screen and then click on the More Forms… button and the “Forms Wizard” to create a new form.
- Select the Accounts table and all of the available fields and click on the Next button.
- Choose a Tabular layout and click on the Next button.
- For Access 2007 choose the Office style and click on the Next button.
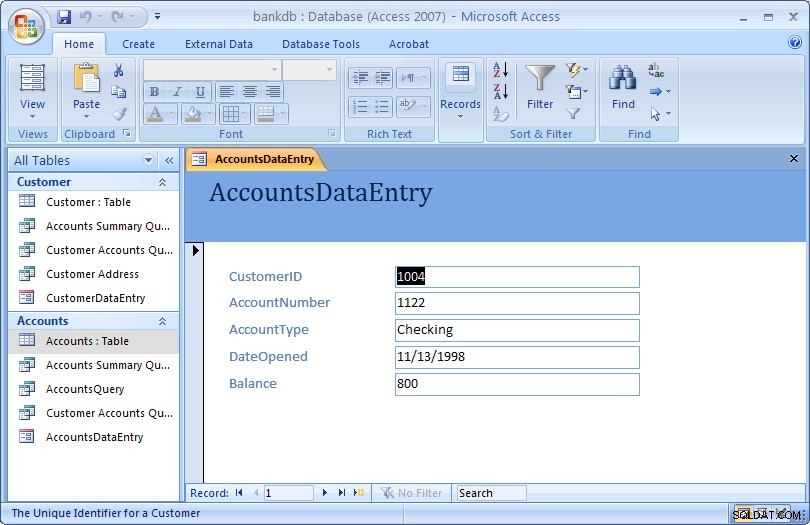
- Name the form:AccountsDataEntry Then click on the Finish button to create, save and view the new form.
The new form is shown in the figure below:
Close the form and return to the Access main screen, by pulling down the File (or Office) menu and choosing Close.
7.3 Review of Creating and Running a Data Entry Form
The basic steps for creating a simple data entry form are:
- Choose a table and a form wizard
- Specify the fields (columns) that will appear in the form
- Specify the layout for the form
- Specify the style (fonts/colors, etc.) for the form
- Save, create and run the new form
In this section we covered the basic steps required to create and run a data entry form. Access provides wizards which are adept at building simple forms with a minimal amount of work. More advanced work on forms would concentrate on using the Design View to change a form’s appearance and to add or remove fields and labels once a form is created. A more advanced tutorial on MS Access Forms Design is linked here.
8 Creating and Running a Report
Reports are similar to queries in that they retrieve data from one or more tables and display the records. Unlike queries, however, reports add formatting to the output including fonts, colors, backgrounds and other features. Reports are often printed out on paper rather than just viewed on the screen. They can also be attached to e-mail and exported and posted as web pages.
As with data entry forms, there are a number of ways to create reports in MS Access:
- A report can be created “by hand” in Design view
- A default report can be created automatically based on all of the firleds for a given table.
- A report can be created using the Create Report wizard.
In this section, we cover how to create simple reports using the Report wizard.
8.1 Creating a Single Table Report using the Wizard
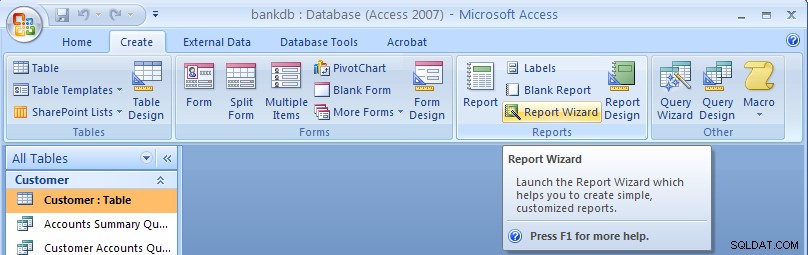
In this example, we will create a simple report for a single table using the Report wizard. As with the Queries and Forms, we begin by selecting the Create tab from the Access main screen.
To create a new report, click on the Report Wizard button.
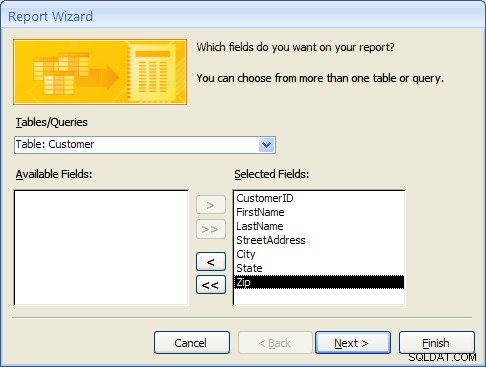
In the next step of the Report wizard, is used to specify the fields from the Customer table that will appear on the report. In this case, we want all of the fields to appear. Move each of the fields from the Available Fields side over to the Selected Fields side as in the following figure. Then click on the Next button.
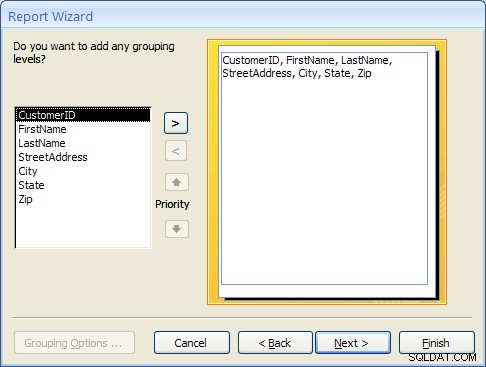
In the next step, we have the opportunity to add Grouping Levels to the report. A grouping level is where several records have the same value for a given field and we only display the value for the first records. In this case, we will not use any grouping levels so simply click on the Next button as shown below.
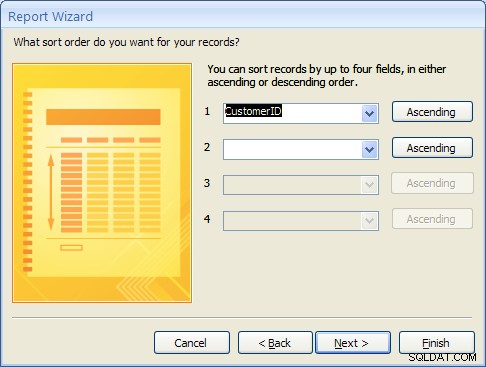
In the next step, the sorting order of the report can be specified. For this example, we will sort the records on the CustomerID field. To achieve this, pull down the list box next to the number 1:and choose the CustomerID field as shown in the figure below. Then click on the Next button.
8.1 Creating a Single Table Report using the Wizard (Continued)
The next step is to specify the layout of the report. The three options are:
- Columnar – Places the labels to the left of each field. This is similar to a paper form.
- Tabular – Places the field labels at the top of the report page and the records are displayed below. This is similar to how a spreadsheet would display the data.
- Justified – Places the labels above each field with the fields spread out on the report page.
Generally, reports use the tabular layout. For this example, choose Tabular layout and set the page Orientation to Landscape so that all of the fields will fit across one page. This is shown in the figure below. Click on the Next button to continue.

In the next step, the style of the report can be selected. For this example, choose the Office style and click on the Next button to continue.

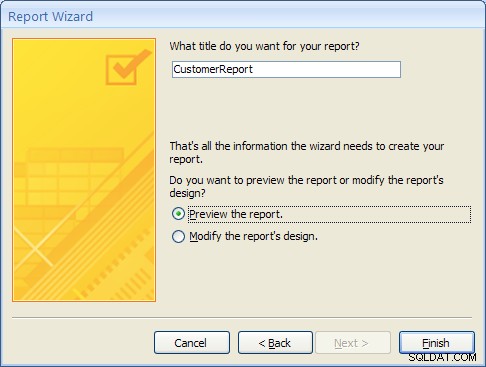
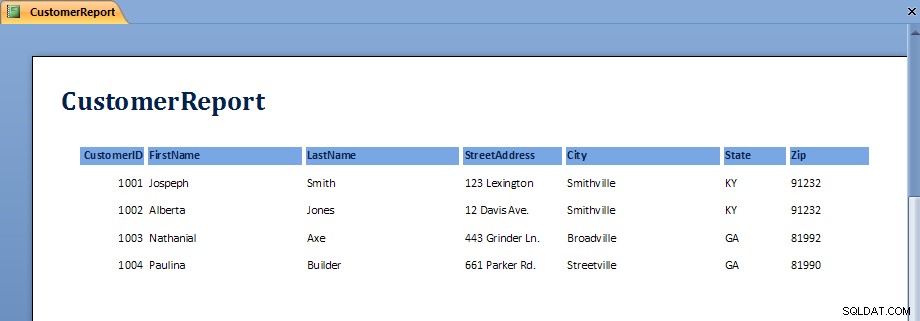
Finally, give a name for the new report:CustomerReport and then click on the Finish button to create, save and display the new report.
The output from the report is shown in the figure below. Note that on some screens, the last field, Zip, may not display without scrolling over to the right.
Once the report is displayed, it can be viewed, printed or transferred into Microsoft Word or Microsoft Excel. The button bar across the top of the screen has the following functions:
 | Print the report |
 | Zoom into a region of the report |
 | Display the report as one, two or multiple pages |
 | Zoom into or out of the report |
 | Transfer the report into MS Word |
 | Close the report |
To close the report and return to the Access main screen, click on the Close button.
8.2 Exercise:Creating a Single Table Report
For this exercise, we will create a report showing all of the Accounts information.
- From the Access main screen, click on the Create tab and Click on the Report wizard.
- Select all of the fields in the Accounts table by moving them all over to the Selected Fields side and then click Next
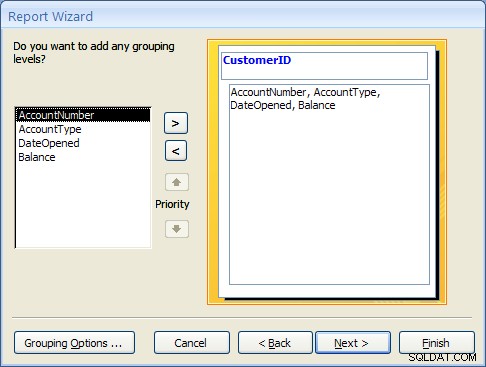
- Group the report by CustomerID by clicking on the CustomerID field and then clicking on the right arrow button. This is shown in the following figure:
Click on the Next button to continue. - Choose to sort the report on the AccountNumber поле. Note that a new button will appear called Summary Options.
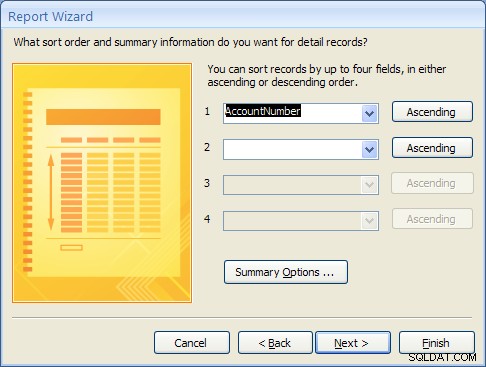
Click on the Summary Options button. Choose the Balance field and select the Sum option. Choose the option to show both Detail and Summary data. Then click on the OK button.

Click on the Next button. - Choose a Block layout and click on the Next button.
- Choose the Corporate style and the click on the Next button.
- Finally, name the report:AccountsReport and click on the Finish button to create, save and run the report.
The output from the AccountsReport is shown below:
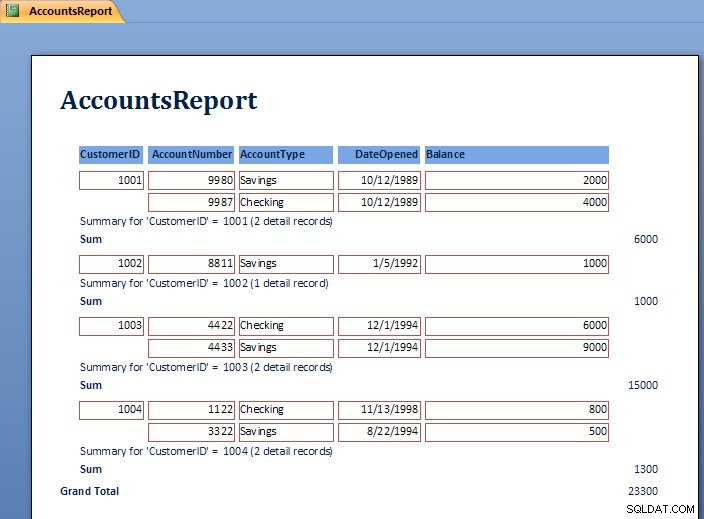
Note the Grouping at the level of the CustomerID and the Sum for each customer’s balances.
To close the report and return to the Access main screen, pull down the File menu and choose Close.
8.3 Review of Creating and Running a Report
As can be seen in the report exercise, there are many ways to create reports to show summation, sorting and layout of the data. Further study of Reports will show how to modify the layout using the Design View. Students are encouraged to work with the Report wizards to create different styles and types of reports.
9 Creating and Running a Master/Detail Form
Master/Detail forms are used to display data from two tables at the same time. MS Access calls the “details” a “subform”. The forms are linked according to the relationship between the tables. Recall that in the example database, the CustomerID is used to link the Customer table (Master) to the Accounts table (Detail). In this section a master / detail form for the Customer and Accounts tables will be created.
- From the Access main screen, click on the Create tab and Click on the “More Forms…” section and finally the “Forms Wizard”.Select the Customer table first and move the CustomerID, FirstName and LastName fields to the Selected Fields list.Next, select the Accounts table and move the AccountNumber, AccountType, DateOpened and Balance fields to the Selected Fields list as shown below.
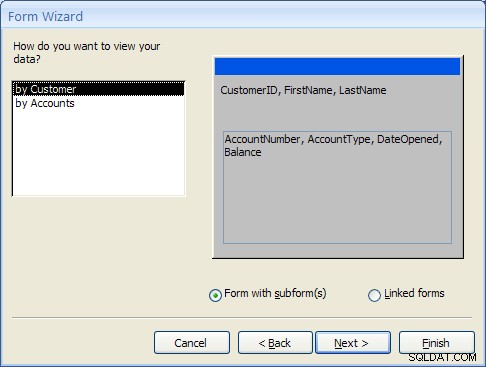
Click the Next… button to move to the next step. - At this point MS Access detects that this form will involve data from two different tables. The first prompt asks how the form should be organized at the top or “Master” level. The “by Customer” selection should be highlighted.The second prompt asks how the forms should be created. For this example, select “Form with Subform(s)” as shown below and click the Next… button to move to the next step.
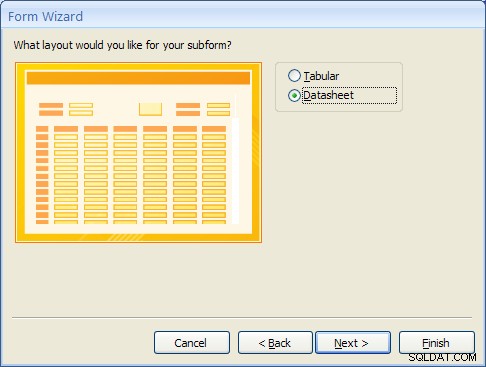
- The Subform is the form that will display the detailed data from the Accounts table. Selecting the “Datasheet” layout will make it easy for the user to view the multiple accounts a Customer may have. Select “Datasheet” and click the Next… button to move to the next step.
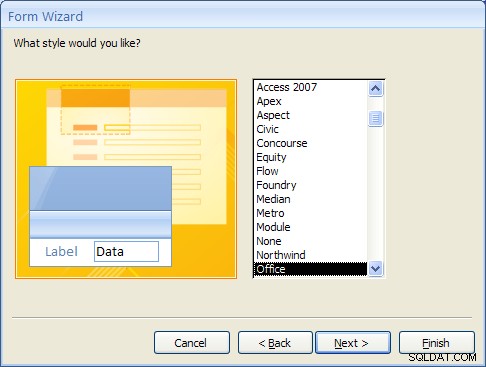
- For Access 2007, select the Office style and click the Next… button to move to the next step. (This step will not appear in MS Access 2010 or 2013).
- Finally, give the main form the name “CustomerMasterForm” and the Subform the name “Accounts Subform”.
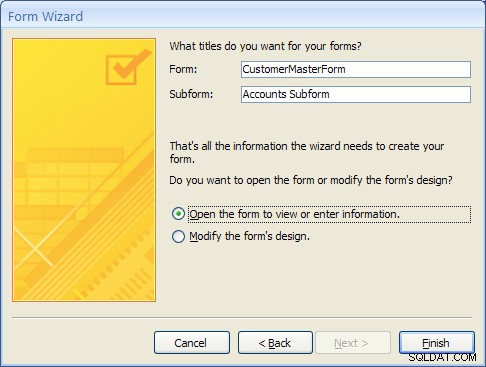
- After clicking on the Finish button the new Master/Detail form will appear as shown below.
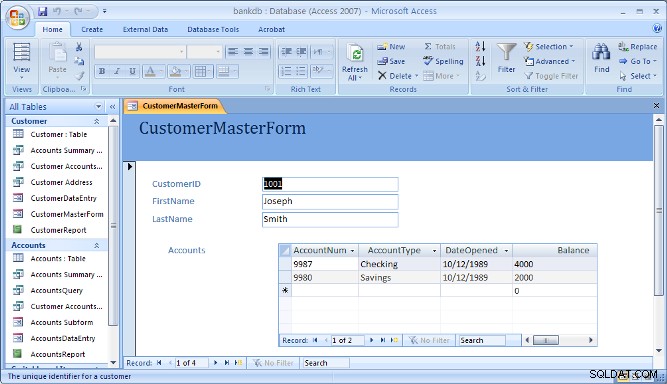
Note that the navigation bar at the bottom of the form is used to navigate through the records in the Master (or top) part of the form.
10 Creating and Running a Switchboard
A Switchboard is a type of form that displays a menu of items that a user can click on to launch data entry forms, reports, queries and other actions in the database. A switchboard is typically created after all of the forms and reports for a database application have been completed. It can be used to guide the user to an appropriate set of forms and reports.
Note that starting with Access 2010, Switchboards are not available by default (you will need to add this to the ribbon bar manually using the Options). Access 2010 and 2013 make use of the Navigation Forms.
In this section, a default switchboard will be created.
- From the Access main screen, click on the Database Tools tab and Click on the Switchboard Manager as shown in the figure below.

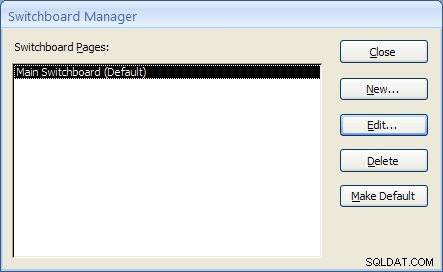
If this is the first switchboard made for this database, you will be prompted to create a new one as shown below. Click the Yes button.

- The Switchboard manager will appear as shown below:
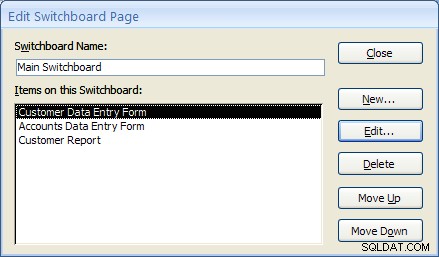
- Click on the Edit menu to edit the “Main Switchboard”. The Edit Switchboard Page will appear as shown below:
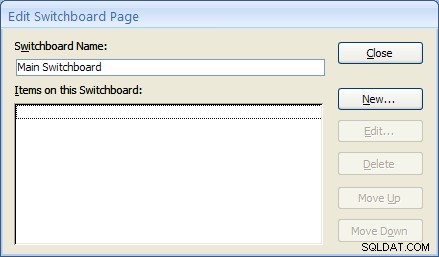
- Add a new switchboard item by clicking on the New… button. The Edit Switchboard Item form will appear as shown below. Fill in the fields as follows:
Text: Customer Data Entry Form Command: Select Open Form in Edit Mode from the drop down list. Form: Select the “CustomerDataEntry” form from the drop down list. 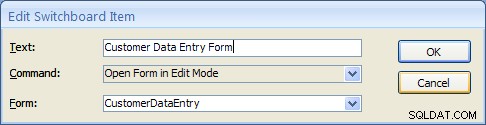
Click on the OK button to save this new Switchboard item.
- Repeat the above step two more times to add Switchboard items for the Accounts DataEntry form and the Customer Report.
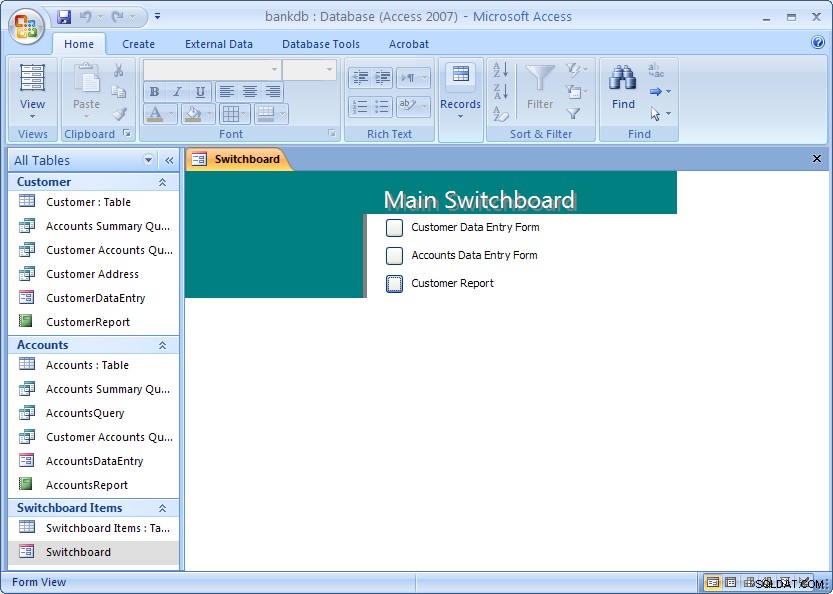
Once completed, click the Close button. Then click the Close button once more to close the Switchboard manager. - From the main MS Access screen look for a new section labeled Switchboard items. To view the switchboard, double-click on name “Switchboard”.
The next section covers creating a Navigation Form which is the recommended navigation screen for MS Access 2007, 2010 and newer versions.
11 Creating and Running a Navigation Form
MS Access 2010 introduced a new form called a Navigation Form. Navigation forms take the place of Switchboards but provide much the same functionality. Namely, they are designed to give the user the ability to run forms and reports without having to hunt through all of the different menus and lists objects. Typically a database application will have one main Navigation form that will appear when the database is opened.
In this section, the basic steps for creating and running a Navigation Form in MS Access 2010 will be demonstrated.
A Navigation Form is another type of form in MS Access 2010 and 2013
- To get started, click on the Create tab on the Access 2010 or 2013 ribbon bar. Under the section for Forms look for the item labeled Navigation Form. Note that this may be located on the button labeled Other Forms.
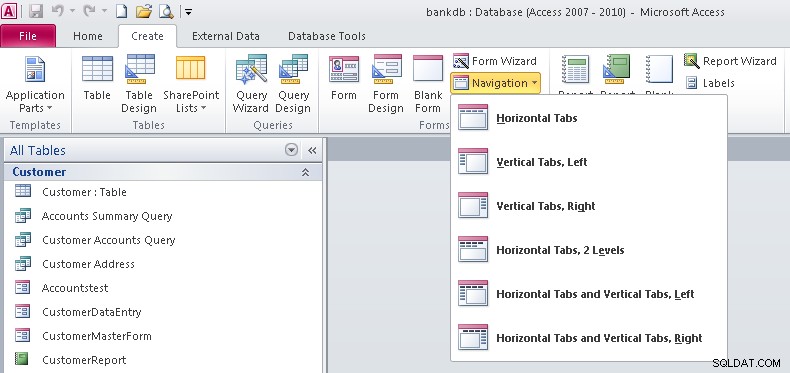
- Note that there are 6 different default styles of Navigation Forms. Each one places the buttons in a different configuration on the screem. Buttons can be aligned across the top, either side or some combination.For this tutorial select the Horizontal Tabs configuration which appears as the first item on the list.
- At this point a new Navigation Form will be created with a row of tabs across the top. The first tab will be labeled [Add New]
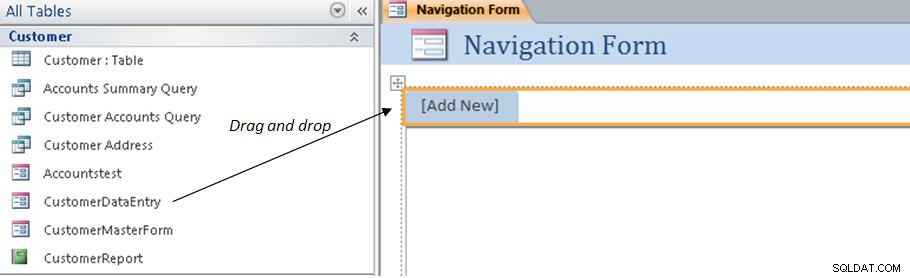
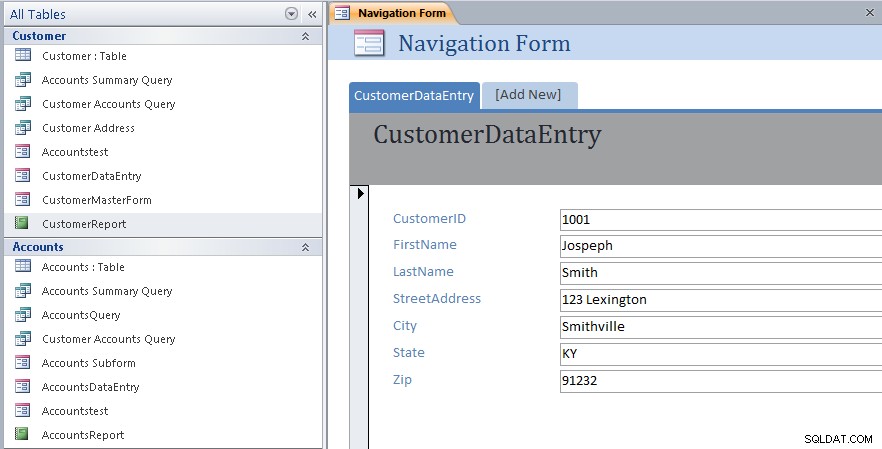
- To add items to the Navigation form, drag the items from the list on the left over to the spot on the Navigation Form labeled [Add New]. This is shown by the arrow in the above figure. For example, drag over the CustomerDataEntry form to the Navigation Form. The result is shown below.
- Next drag and drop the CustomerMasterForm as shown below.

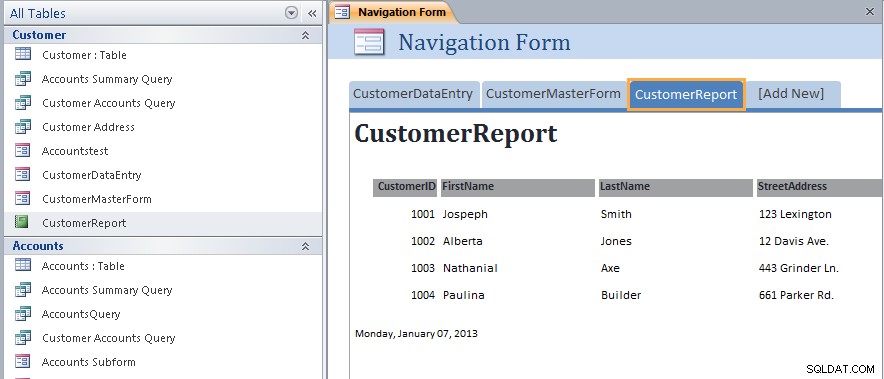
- Next drag and drop the CustomerReport as shown below.
- At this point we have created a new navigation Form and added three items along the top of the page. Save the Navigation Form by right-clicking on the name of the form and choosing Save as shown below:
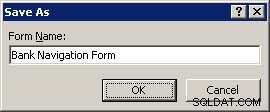
- Name the Navigation Form:Bank Navigation Form and click the OK button.
- Close up the Navigation Form by right-clicking again on the name of the form and choosing Close menu item.At this point the new Navigation Form has been created and saved. The next step will be to view the Navigation Form and navigate the different forms and reports linked to it.
- To view the Navigation Form, look for the Unrelated Objects group on the left side of the screen. Double click on the Bank Navigation Form item as shown below:
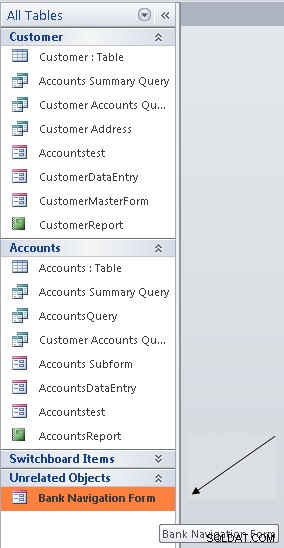
The Navigation Form will appear: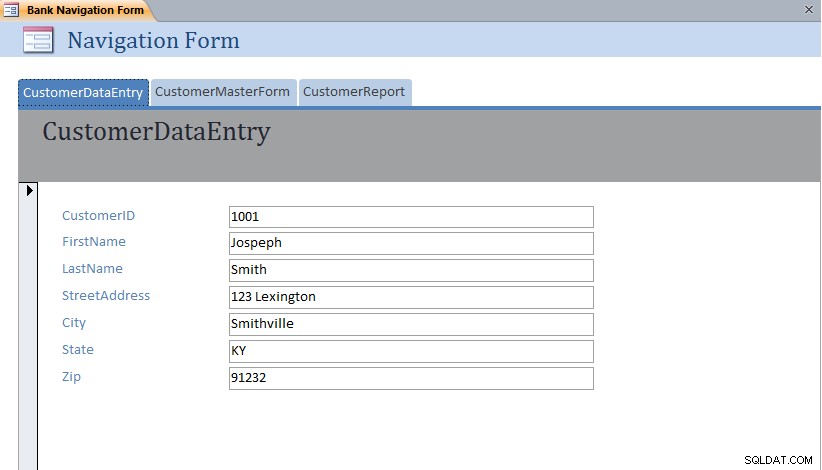 Note that each form or report can be displayed simply by clicking on the different tabs across the top of the Navigation Form.
11.1 Exercise:Modifying a Navigation Form
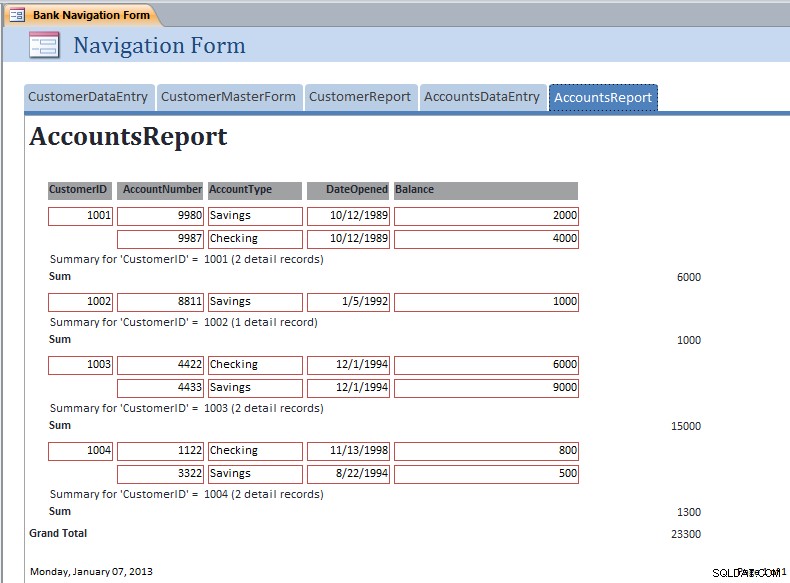
For this exercise, edit the Bank Navigation Form in Layout View and add the following new items to the Navigation Form:
- AccountsDataEntry
- AccountsReport
The resulting Navigation Form should appear as below with the AccountsReport opened:
11.2 Setting the Navigation Form as the Default
MS Access 2007 and 2010 (as well as earlier versions) have the ability to set a default form that will open up automatically once the MS Access data file is opened. This is especially useful for end users so that they always see the same form when they open up the database.
To set the Default Form, pull down the File menu and select the Options menu item.

The Database Options form will appear. Click on the Current Database item on the left hand side.
Under the Application Options heading, look for the Display Form:prompt and set this to the Bank Navigation Form as shown below:
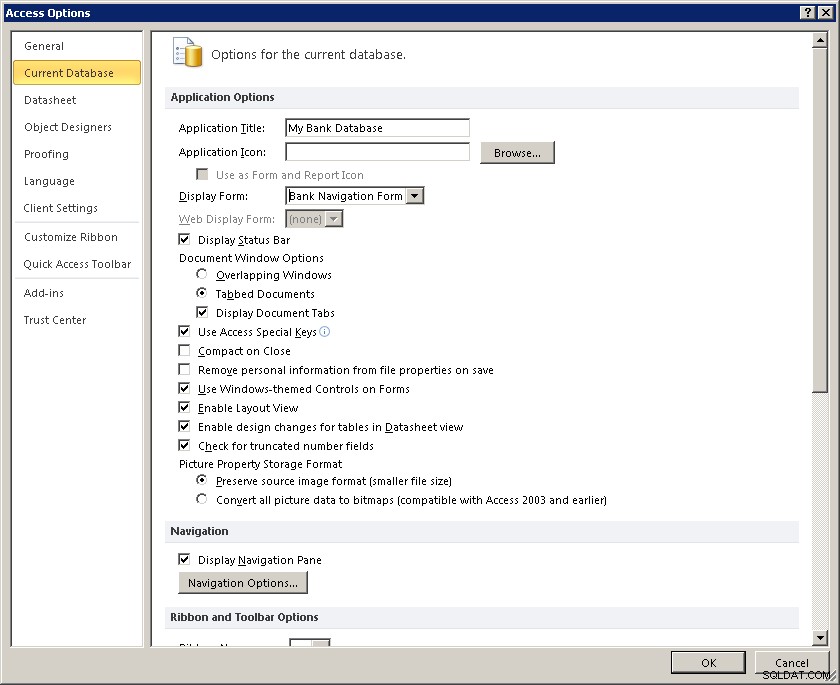
Click on the OK button to close up the Database Options screen.
The next time this database (bankdb.accdb) is opened, the Bank Navigation Form will open up.
12 Tutorial Summary
In this tutorial, we have covered the basics for creating an Access database including tables with data, queries to retrieve data, forms to enter data and reports to display and summarize data.
Students are encouraged to further their Access knowledge and skills by working through more advanced tutorials such as Advanced Access Database Table Design and Advanced Access Forms Design, and by reading the on-line help and Access documentation.
You may also be interested in this tutorial that covers up-sizing the Access database to Microsoft SQL Server using the Microsoft SQL Server Migration Assistant.